The following will detail the
conversion/restoration of this cabinet.
BACK
 |
Here is the possible mockup
of the newest cabinet to join the MMP lineup, the ZoldoMame.
Based on requests from the new owner, this cabinet will
hopefully evolve into exactly the cabinet he wants. This
is the first rough draft, I'm waiting for a response to see what
can be fine tuned. |

PERCENT COMPLETE |
| |
Here is the cab at the beginning. I have stripped out the
guts, and am seeing what, if anything, can be salvaged.
t-molding needed to go, and I have started the artwork for the
marquee, now that I have the measurements. This will have
artwork on the marquee, bezel and control panel. |
 |
|
| |
Well, right down to work. The sides are going to have
sideart applied, but first I need to improve the appearance.
I am filling the bolt holes and scratches, and then I will sand,
prime, sand and paint the sides. Nice and easy way to get
a mint looking cabinet! |
 |
|
| |
First coat is on. One more tomorrow for good measure.
Looks nice. I have a request from the new owner to go with Galaxian green t-molding on this. Also going to move the
coin door down to make the new panel fit. Big improvement
from the flat black, gouged cab I started with. |

|
|
| |
The
possible graphic for the marquee, bezel sideart and underlay...keeping with the requested
theme. Zoldo logo trademark of Nintendyouknowwho. Pretty
sad when I have to worry about litigation over a theme-cab when
the intended owner is obviously just a huge fan. Don't
worry, the actual cab has proper graphics. :) |
 
  |
|
| |
From cad to
the workroom. Here I am testing my cad measurements and
seeing if everything will fit and be useable. As a side note,
this will likely be my last 'frankenpanel' build, there was just
too much to this. My next projects will be 2 player setups
only. |
 |
|
| |
Here's the new panel on
the drill press. I am still waiting on the green
t-molding, and for the rotary sticks. I had optical
sticks, and had to return them and re-order the rotary ones.
Or vise versa. Whichever ones have the Ikari warrior plug,
those are the ones I had. So I figured I'll place all the
other controls and maybe drill the plexi while I wait for them
to arrive. Now that I know the layout will (should) work,
I can construct the bottom of the panel and mount it to the cab.
Then it's all downhill. I'm trying to make a Christmas
delivery, but it looks like I need a few elves to help out
between now and then! |
 |
|
| |
Okay, the base came together
well. Carpenter's glue, biscuits, and clamps make for a
sturdy construction. Metal brackets will make it bullet
proof before it's done. |
 |
|
| |
Well the green
t-molding arrived, the base is built, puttied (but not sanded),
90% of the button holes are drilled, and the plexi is in place.
Groove for the molding is cut in the top, but it's just set in
there for now until I can get the piece primed, painted, and the
graphic on. It's sitting on a stool to give me a better
idea of height...a little higher yet...
It's a big panel to hold
all those controls! (still waiting for the rotary sticks to come
from Happ).
|
 |
|
| |
My plan is to mount the panel
up and back, flush with the bottom of the bezel glass (red
line). It looks to me like the 4 players will all be able
to see the screen, have a bit of elbow room, and not be too far
out the sides. |
 |
|
| |
Well, I know I've
joked about this before, but this time, I can tell you I swore
for a long long time. It was THE VERY LAST F******G HOLE!
I mean, the last one, it was this, and then bolt it all
together. I can't even figure out what god I offended that
makes me finish an entire piece of plexi (and this one took all
my free time for the past 2 days), and then break on the last
hole!!!!!!!!!! Well, I guess another trip to Home Depot
tomorrow, and start drilling all over again. :sigh: Excuse
me while I go swear some more. |
 |
|
| |
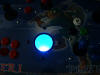
The LED canon I
tried out for this project is better than expected. It
makes the ball glow great, and is a cinch to install and hook
up. Here it is installed on the trackball. Once the
system is a bit farther along, I will have pics of it lit up.
Believe me, it is a nice easy solution to cab lighting! |
 |
|
| |
|
|
|
| |
Hope everyone had a nice
Christmas! Here's a couple of quick shots of the marquee
all lit up and the control panel with everything finally
installed in it.
|
  |
|
| |
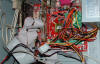
Just in case anyone is
wondering, this is indeed a bitch to wire up. What I'm
doing is wiring the player one joystick to the player one rotary
stick, and the ball-top wico. The fire buttons for the
rotary sticks are wired to the player one and two fire buttons.
Here you can see the wiring almost done, everything except the
ground wire, and the opti-pac. I'll of course clean up the
wiring a bit with more ties before it's finished. |
 |
|
| |
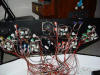
Okay! Wiring
is DONE. Computer is BUILT! Cabinet has its final
paint coat. Back door panel is properly finished.
To the right you will see the glowing trackball (awesome!) and
the system hooked up for a trial run before final installation.
The spinner, trackball and all the controls worked perfectly
first time around. The rotary sticks are working, but I
think there is a trick to getting mame to recognize them
properly. I've had one good game of Ikari warrior and
Heavy barrel so far though, just couldn't get player two
spinning. Well, off to find out about mame analog+.
Still, a VERY rewarding day. If I can get the rotary
figured out, it's just the monitor mounting that's left really.
Almost done!!!
|
  |
|
| |
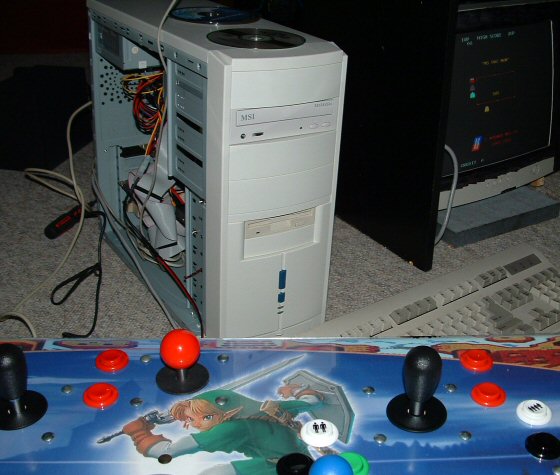
Here is the system going in:
MSI motherboard, AMD 2500+ retail chip, 512meg of 400FSB DDR
ram, an Asus Geforce 4 MX agp card, a 52X MSI burner,
Soundblaster Live! Platinum, 40 gig Maxtor Hard Drive and Altec
Lansing speakers with subwoofer. Sound is excellent, and
the system ran everything I threw at it. Considering this
rig is as powerful as most people's desktop pc's (as of this
writing), it should play almost any game, pc or otherwise!
Software onboard is Windows XP that boots straight into Mamewah.
Inside that FE, It is set to run Mame, MameAnalog+ and Arcade
Jukebox 8. |
 |
|
| |
The coin door
polished up nicely, and you can see the 'link' graphic.
New lock from home depot looks authentic. New bulbs from
the auto supply store, and this door comes to life!
|
 |
|
| |
20" IBM monitor with
trinitron tube. Here it is out of the shell installed in
place in the cabinet. The plastic bezel placed on top
gives it that perfect finished appearance. |
 |
|
| |
Here you can see the bezel
graphic. It cost a fair bit to have that done all in one
piece, considering I was just going to cut the middle out of it,
but it would have been cheesy to cut and paste strips in there,
so I'm glad I spent the extra $$$. |
 |
|
| |
Cab is finally done!
Whew! I have to install the computer startup button
somewhere, and replace the bulbs in the coin doors, but it's
done! I plan to give this puppy a good workout before I
ship it off, and I'm all jazzed about starting the next one!
This one seemed to take forever, but it was the most fun to do.
If you have any questions about how I did any of it, just ask!
|
 
 |
|
| |
As a final touch, I added a
step-on power pedal. This can be placed anywhere, and you
just step on it to turn on the power. |
|
|
| |
|
|
|
|